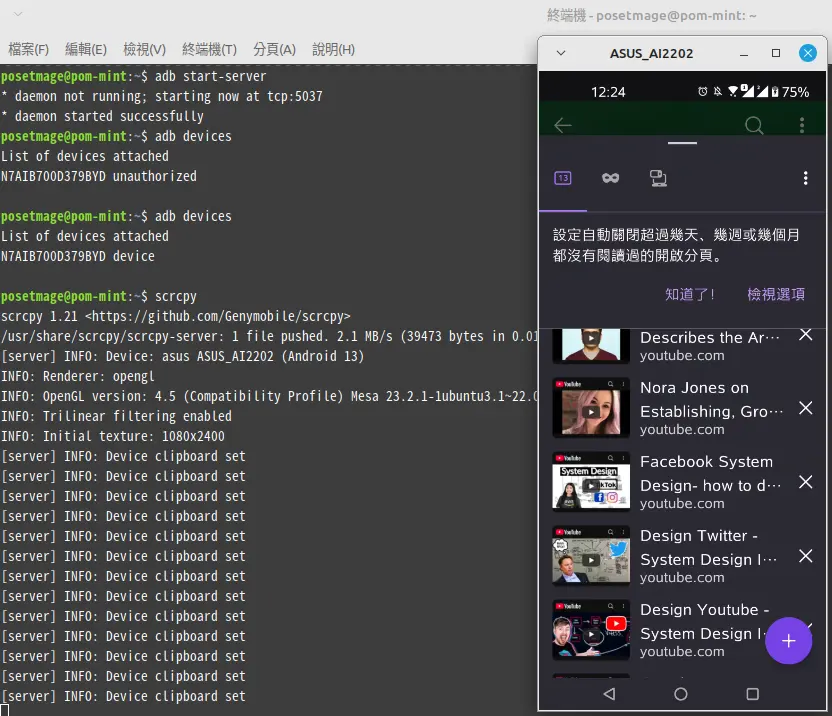
Operate Android Mirror Projection
Using scrcpy is one of the best ways to mirror and control your Android phone on Linux/Windows. This guide will walk you through the steps to set up and troubleshoot scrcpy to get your phone connected and working perfectly.
Enable USB Debugging
- On your Android phone, go to Settings > About phone.
- Tap Build number 7 times to enable Developer Options.
- Go back to Settings > System > Developer options.
- Find and enable USB debugging.
- Try connect
adborscrcpy - press Authentication on phone
- connect again
On Windows
Remember Enable USB Debugging first.
Just download from Download — SCRCPY (Screen Copy)
and unzip -> Enable USB Debugging -> run scrcpy.exe
On Linux
Remember Enable USB Debugging first.
Step 1: Install scrcpy
First, install scrcpy on your Linux system. It’s available in most distributions’ package managers.
Ubuntu or Debian-based distributions:
sudo apt install scrcpy
Arch-based distributions:
sudo pacman -S scrcpy
For other distributions, refer to the official scrcpy GitHub page for installation instructions.
Step 2: Run scrcpy
Add user to plugdev group
sudo usermod -aG plugdev $USER
After enabling USB debugging, connect your phone to your Linux system with a USB cable. Then, try running:
scrcpy
If everything is set up correctly, you should see your phone screen appear on your desktop. However, if scrcpy fails, you may encounter an error like this:
scrcpy 1.21 <https://github.com/Genymobile/scrcpy>
* daemon not running; starting now at tcp:5037
* daemon started successfully
error: insufficient permissions for device: user in plugdev group; are your udev rules wrong?
See [http://developer.android.com/tools/device.html] for more information
ERROR: "adb get-serialno" returned with value 1
ERROR: Could not get device serial
ERROR: Server connection failed
This indicates a permissions issue with your device. The next steps will walk you through debugging and fixing this issue.
Step 3: Test ADB Connection
Start by testing the ADB connection to identify the issue. Run:
adb devices
You might see an error like this:
List of devices attached
N7AIB700D379BYD    no permissions (user in plugdev group; are your udev rules wrong?)
This error confirms the problem is related to insufficient permissions for your device.
Step 4: Identify Your Device
To fix the permissions, you need to identify your device using:
lsusb
Example output:
Bus 001 Device 004: ID 0b05:7770 ASUSTek Computer, Inc. Zenfone 9
Here, ID 0b05:7770 shows the idVendor (0b05) and idProduct (7770) values for your device. You’ll use these values to create a custom udev rule.
Step 5: Add Udev Rules
Udev rules help Linux manage USB device permissions. Follow these steps:
- Create a new udev rules file:
sudo nano /etc/udev/rules.d/51-android.rules - Add the following rule for your device. Adjust it based on the
idVendorandidProductvalues you found withlsusb:SUBSYSTEM=="usb", ATTR{idVendor}=="0b05", ATTR{idProduct}=="7770", MODE="0666", GROUP="plugdev"This example is for an ASUS Zenfone 9. Replace
0b05and7770with the values specific to your phone. - Save the file and apply the correct permissions:
sudo chmod a+r /etc/udev/rules.d/51-android.rules - Reload the udev rules:
sudo udevadm control --reload-rules
sudo udevadm trigger
Step 6: Authorize USB Debugging
- Disconnect and reconnect your phone.
- Run:
adb devicesIf your device shows up as
unauthorized, check your phone’s screen for a prompt to allow USB debugging. Select Allow and, optionally, check Always allow from this computer. - Run
adb devicesagain. You should now see:List of devices attached N7AIB700D379BYD device
Step 7: Start scrcpy
With your device recognized and authorized, you can now successfully start scrcpy:
scrcpy
Your Android screen should appear on your Linux desktop, and you can control your phone directly from your computer.
